You can create a LinkedIn banner with AI by uploading a screenshot you want to use as inspiration, describing what you want to change, and editing the generated design before exporting it.
I tested this in Claude Design using just one screenshot. Instead of giving me a flat image, it created an editable banner where I could change the text, fonts, colors, and layout.
Today, I’ll show you the exact process, the prompt I used, and what you should check before uploading the final banner to LinkedIn.
How I Tested This Method
I didn’t ask AI to invent a random banner from scratch. I chose an existing LinkedIn banner as my design reference, uploaded the screenshot to Claude Design, and replaced the original details with new text for a software engineer profile.
I chose Claude Design because I could continue editing the individual text and design elements after it generated the first version. You can try the same reference-based process with other AI design tools, but the editing options and final result may differ.
1. Find a LinkedIn Banner Style You Like
Start by finding a LinkedIn banner with a layout you would like to adapt to your own profile. You can browse these LinkedIn banner examples and save one that matches the style you want.
You’re not looking for a design to copy exactly. You’re looking for visual elements that can guide the AI, such as:
- Where is the main text placed?
- How many colors and fonts does it use?
- Does it include skills, results, or company logos?
- Which area is left empty for the profile photo?
For my test, I used my own LinkedIn banner as the reference. I liked the dark background, the large message on the right, the purple accents, and the row of company logos underneath it.
The text also stays away from the left side, where the profile photo covers part of the banner:
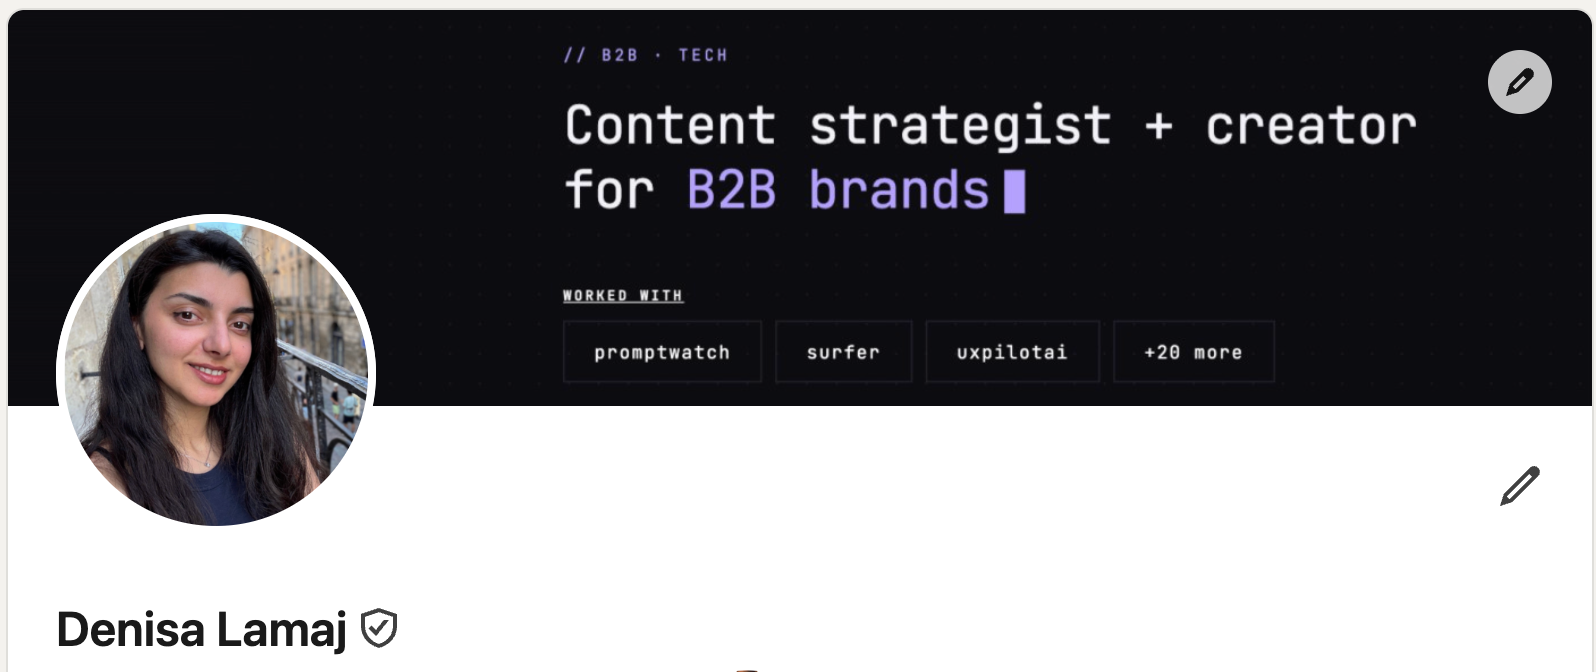
This screenshot gives the AI a clear direction for the layout and spacing. The wording, colors, logos, and other details can then be replaced with information that fits the new profile.
2. Upload the Screenshot to Claude Design
Once you have your reference banner, open Claude Design and upload the screenshot. Claude needs to know which parts of the reference you like and what should change. Asking it to simply “recreate this banner” gives it too much room to guess and may produce something too similar to the original.
Before writing your prompt, you should prepare:
- Your role or main value proposition
- Two to four skills, services, or proof points
- Your preferred colors
- Any company names or logos you want to include
Your banner message should support your profile headline. If you’re unsure how to describe your role, these LinkedIn headline examples for job seekers include several software engineering formats you can adapt.
You can then copy and customize this prompt:
Create an original LinkedIn banner inspired by the attached screenshot. Use a canvas size of 1584 × 396 pixels. Keep a similar overall structure and visual hierarchy, but do not copy the original design exactly.
- Use this as the main text: [YOUR ROLE OR VALUE PROPOSITION]
- Add these skills or proof points: [DETAIL 1], [DETAIL 2], and [DETAIL 3]
- Use [YOUR COLORS] and make the design feel [MINIMAL, MODERN, BOLD, OR ANOTHER STYLE].
Keep the lower-left area clear because the LinkedIn profile photo will cover part of the banner. Make the text and other design elements editable so I can adjust them afterward.
For my test, I used a shorter prompt to create a banner for a fictional software engineer:
Create a LinkedIn banner inspired by the attached screenshot. Keep the same overall style, layout, and vibe, but don’t copy it exactly. Use this text: Software Engineer @ Tech Company. Make it clean, modern, and tech-focused.
Here’s how I added the reference image and prompt inside Claude Design:
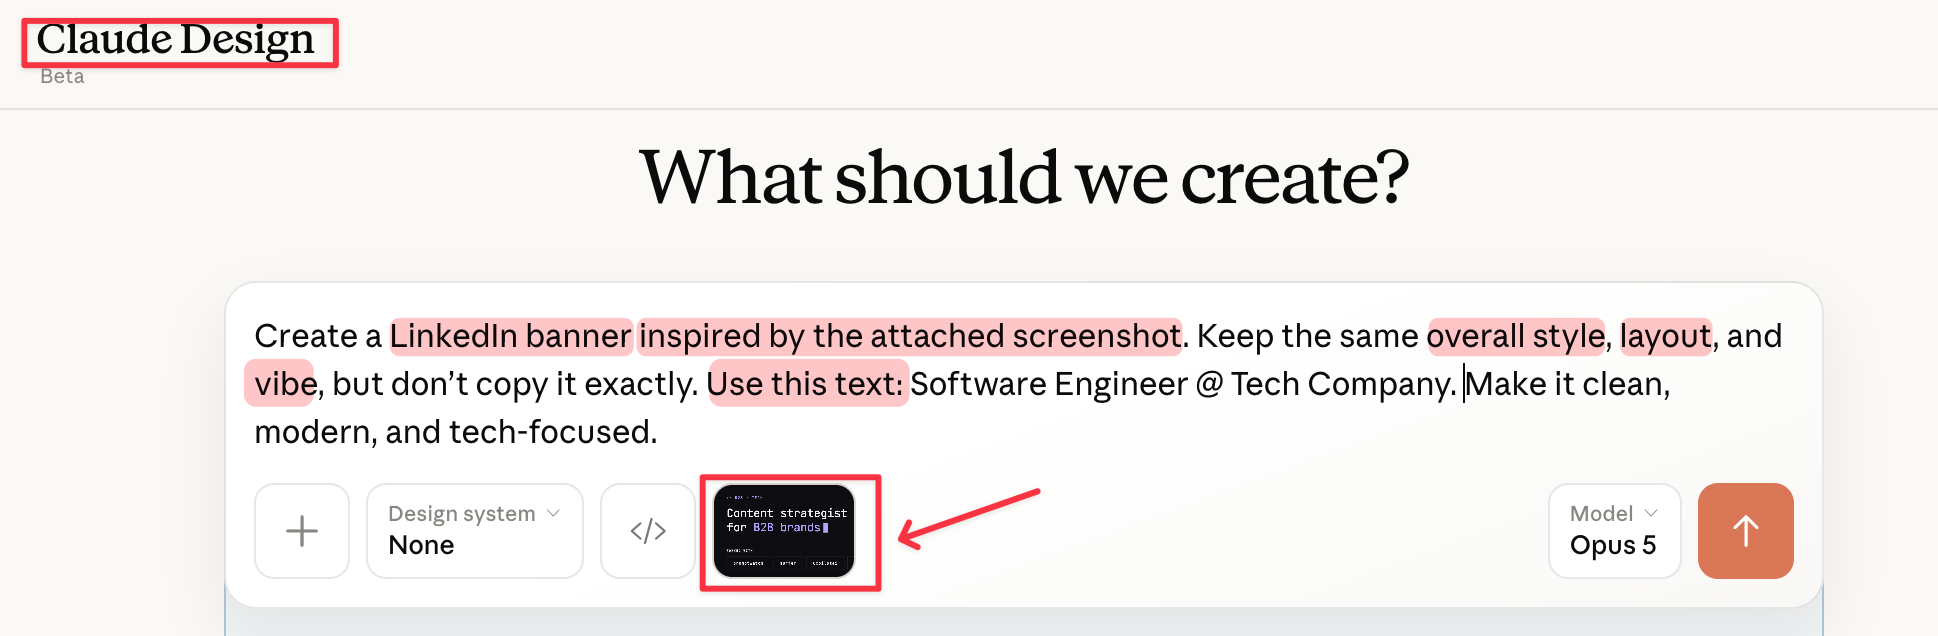
The prompt gives Claude three clear directions: which design to use as inspiration, which text to add, and how the final banner should feel.
If you want a more specific result, use the longer prompt above to define the colors, supporting text, and space for your profile photo. This should reduce the amount of editing you need to do afterward.
3. Review and Edit the First Version
Once Claude generates the first version, it opens the banner inside an editable workspace.
This is the part I found most practical. When I use ChatGPT for this type of design, I usually need to explain the change in another prompt and wait for a new version. With Claude Design, I can make small corrections directly in the editor and use another prompt only when I want to change the overall layout.
In my example, Claude kept the dark, technical style of the reference banner. It moved the main message to the right and added several technologies underneath it.
The overall structure worked, but I still needed to check and edit the individual elements:
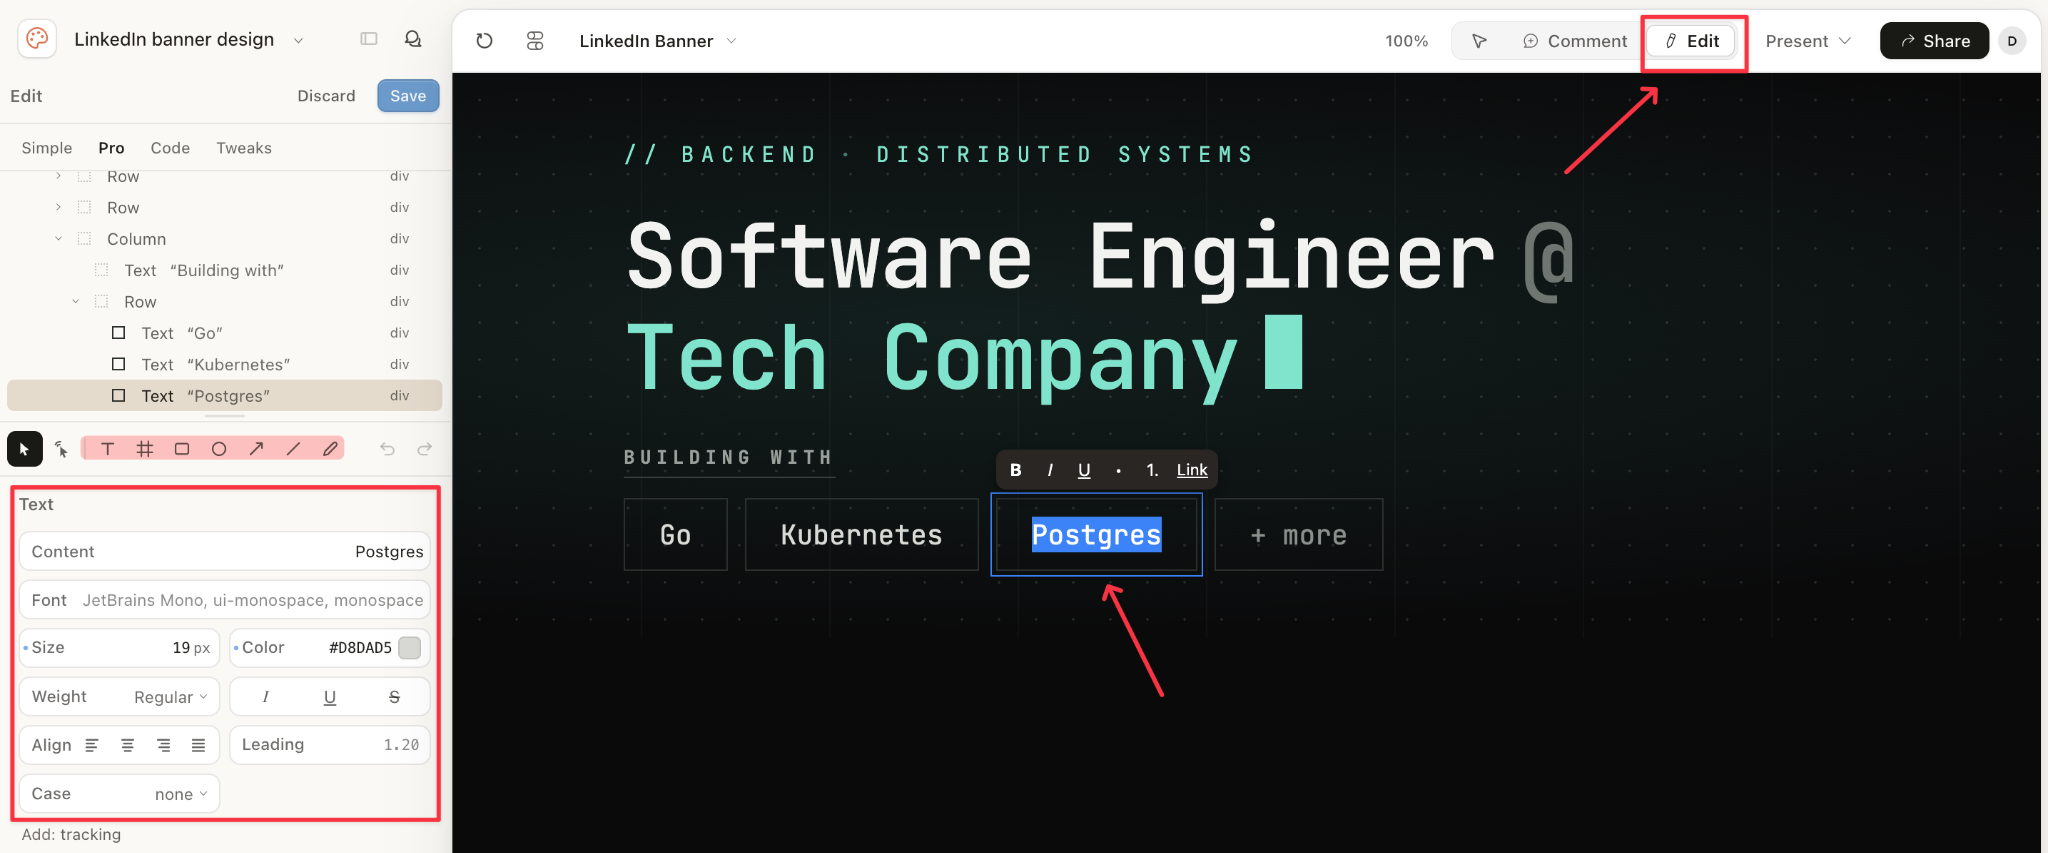
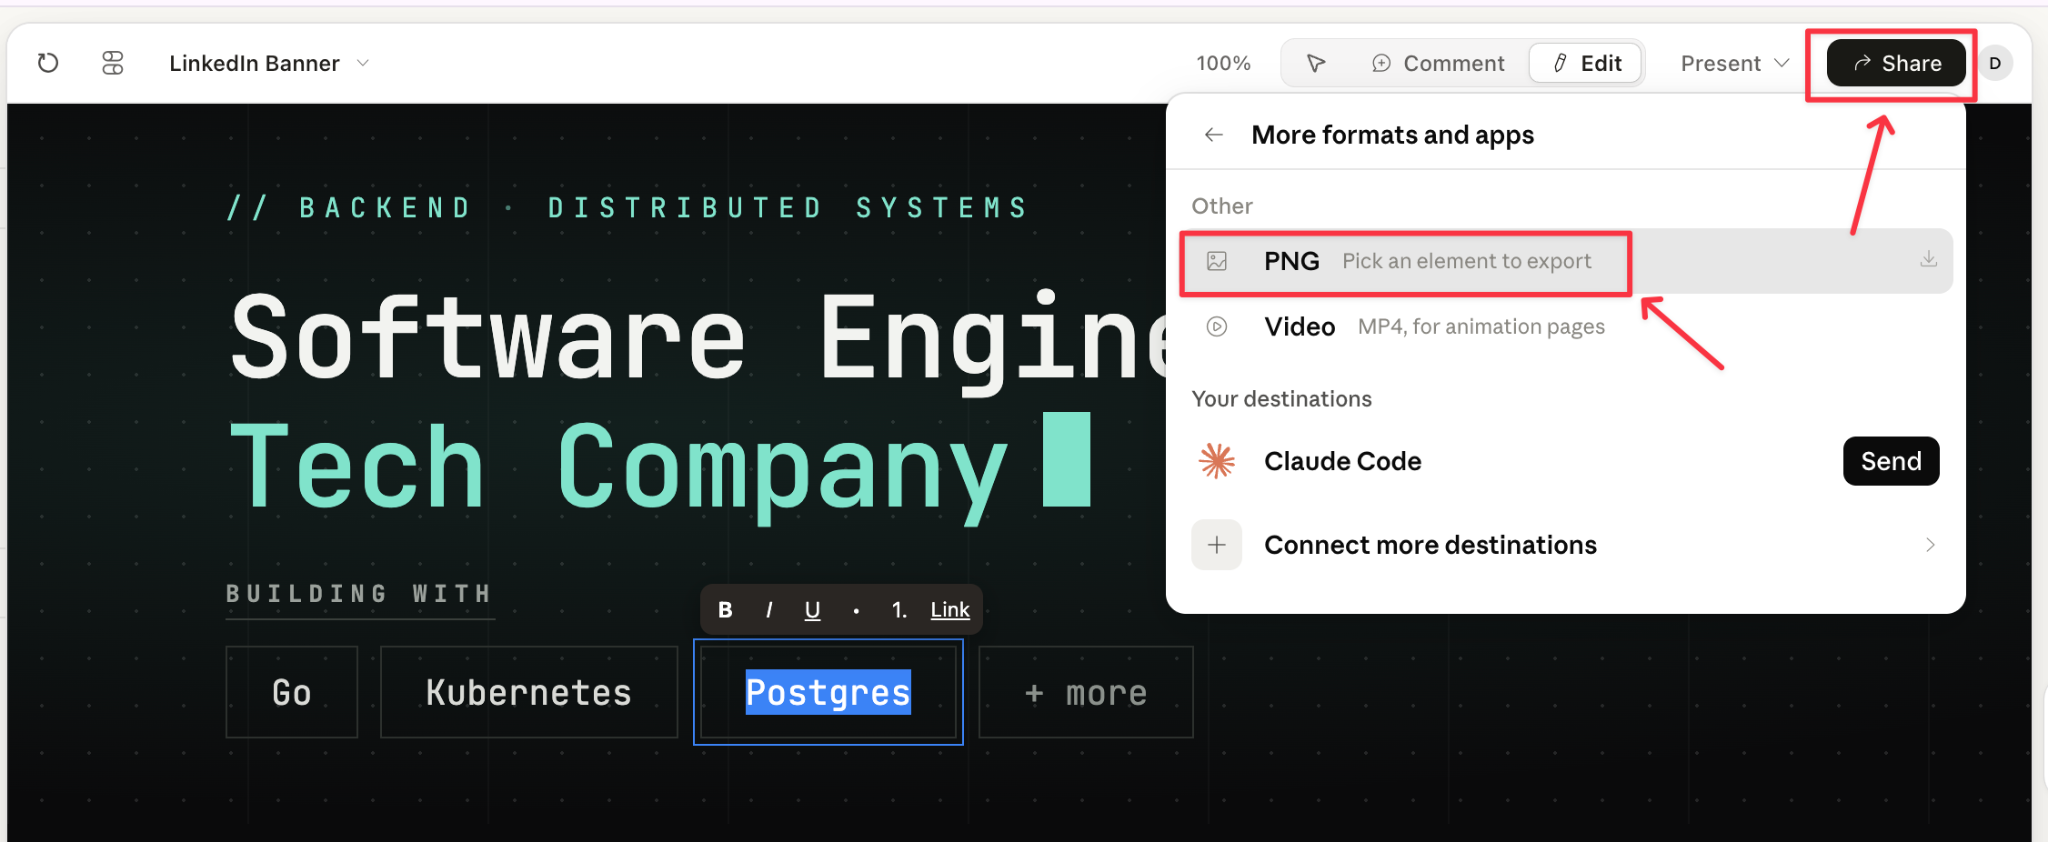
Click Edit, then select any text or design element you want to change. In the screenshot above, I selected “Postgres,” which opened the editing options on the left.
From there, you can change its:
- Text
- Font
- Size and weight
- Color
- Alignment
- Position
Before moving to the next step, you should check:
- Whether all the text is correct
- Whether the main message is easy to read
- Whether the colors have enough contrast
- Whether the lower-left area remains clear for your profile photo
- Whether any part still looks too similar to the reference banner
If the overall layout needs more work, ask Claude to revise the banner instead of moving every element manually. For example:
Make the main text larger and move it farther to the right. Remove the extra decorative elements, increase the contrast, and leave more empty space on the left for the LinkedIn profile photo.
You can continue giving Claude short follow-up instructions until the overall design is right, then use the editor for the final text, font, color, and spacing adjustments.
4. Export and Upload the Banner to LinkedIn
Once you’re happy with the design, export the complete banner as a PNG and upload it as your LinkedIn cover image.
First, select the complete banner frame rather than an individual text or design element. Then click Share, choose PNG, and download the file.
LinkedIn recommends a cover image size of 1584 × 396 pixels. It accepts JPG or PNG files smaller than 8 MB, according to its official cover image guidelines.
To upload your new banner:
- Open your LinkedIn profile.
- Click the edit icon in the upper-right corner of your current cover image. If you don’t have one yet, click the camera icon in the same area.
- Select Change photo or upload a new image.
- Choose the PNG you exported from Claude.
- Adjust its position if needed and click Apply.
Open your profile on both desktop and mobile after publishing it. LinkedIn notes that the way a cover image appears can change depending on the browser window and screen resolution.
If any important text is hidden or cropped, return to Claude Design, move it closer to the center or right, and export the updated version.
Your Banner Is Live. Now Give People a Reason to See It
People won’t see your new banner while scrolling through their LinkedIn feed. They need to view your profile to see it, so announcing the update in a post can encourage them to click through.
I’ve done this myself with a very simple post asking people what they thought about my new banner. It didn’t need a long story or a detailed explanation.
You can use a post like this:
I just updated my LinkedIn banner using AI.
I wanted it to make [what you do or want to be known for] clearer as soon as someone visits my profile.
What do you think?
If your goal is to bring people to your profile, you don’t necessarily need to attach the banner to the post. Let them visit your profile to see the final result.
You can write and schedule the announcement in Podawaa once your banner is live. If you want to give the post more visibility, you can also use Podawaa’s Boost feature.
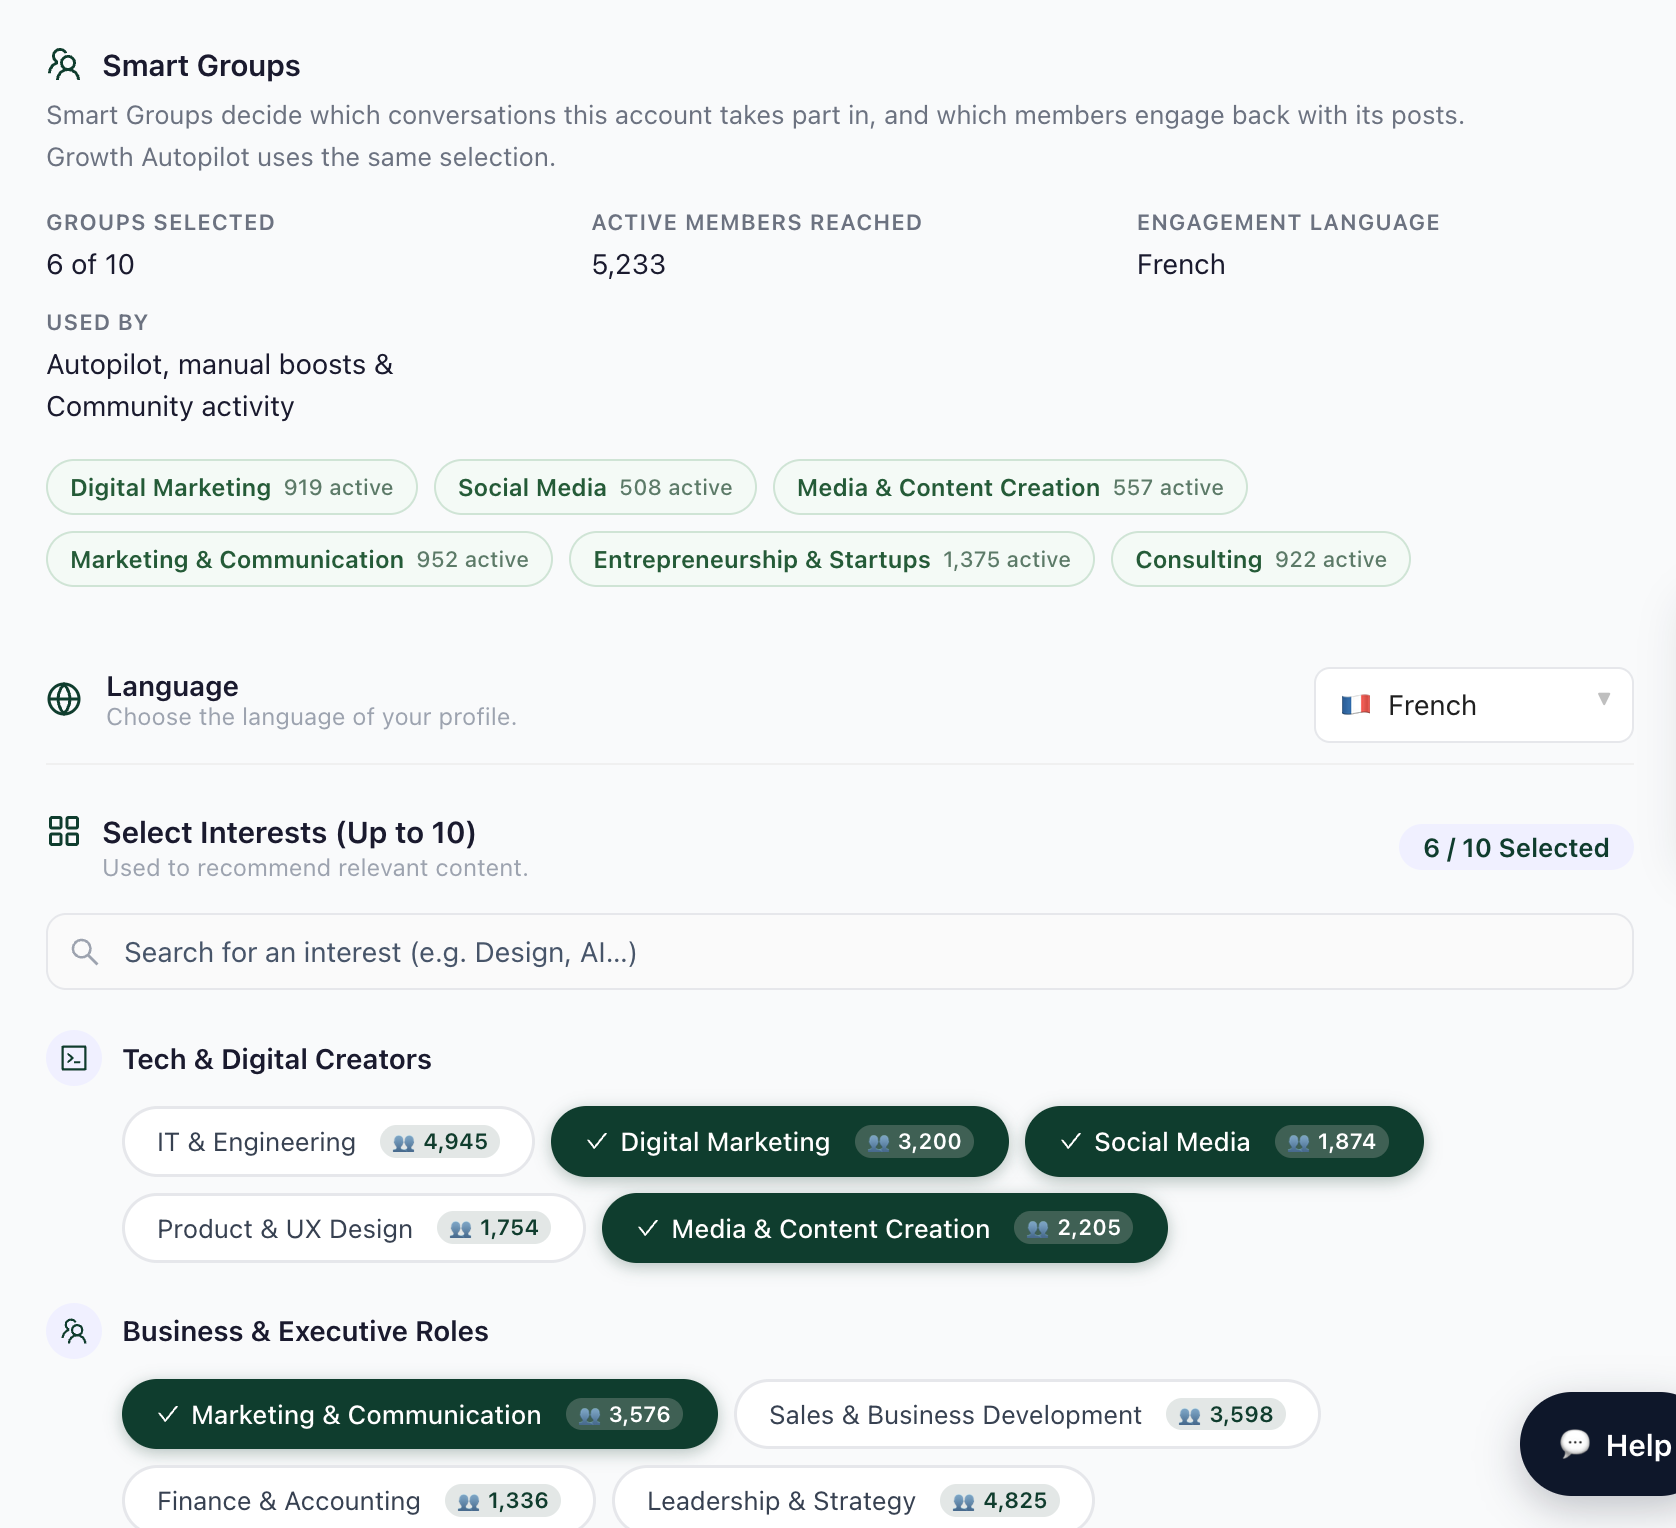
Podawaa’s Smart Groups let you choose the language and interests used for manual boosts. For this software engineering example, I would select English as the language and choose groups such as IT & Engineering so the engagement comes from people connected to the topic.
Your banner explains what you do once people arrive. The announcement post gives them a reason to visit in the first place.